This button allows you to set up the properties of one of the most common tags in the HTML language:
<a href="xxx" name="yyy" title="zzz"> ... </a>
Clicking on the button brings up the Anchor setup dialogue box:
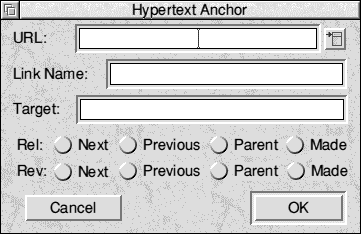
Dragging a file into the window allows you to link to another file or page on your own site. As before, provided that you have already saved your page to disc, a relative path will be created for the link.
There is a menu button next to the URL field, which brings up a combined menu of all the tsgs in your URL database (see later) and any named markers in the current document. Click on an entry to select that URL
Clicking on the OK button will then insert the tags.
If you have highlighted a piece of text (or an image tag) before clicking on the Anchor button, the selected region will be marked as the link ie. the <a ... > and </a> tags will be wrapped round it.
Remember that tutorial session 4 explains about setting up links. menu button brings up a combined menu of all the links in your URL database (see later) and any named markers in the current document. Click on an entry to select that URL.
It is HTML jargon to refer to all pictures (graphics) as 'images'! This is because the required tag for displaying any graphic file is:
<img src="xxx" alt="yyy" width=m height=n align="zzz" ismap>
The xxx refers to the UNIX path and filename of the image. This must be a UNIX path, as Web Browsers make this assumption and translate it internally. A textual alternative may be supplied for people with text-only Web Browsers - hence yyy in the alt= parameter.
The width and height parameters (HTML 3 only) allow for image scaling, and tell the WWW browser how much space to leave for the image. The zzz for the alignment (also HTML 3) covers both text positioning relative to the image, and the alignment of the image itself.
Finally, you can add the ismap parameter if you have set up a suitable image map file. Full details on how to do this should be available from whoever runs your Web server - it varies from system to system.
Note that there is no </img>, as images can't be applied to regions of text!
Clicking on the Image Setup button opens this dialogue box:
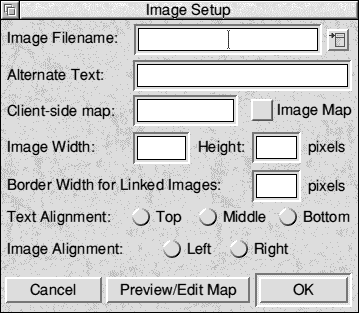
The dialogue box should be fairly self-explanatory, with the fields (going top to bottom) simply filling in the parameters in the order given in the example tag at the beginning of this section.
Dragging a file from a RiscOS directory into the Image Filename field will put its name into the field. Provided that you have saved your HTML page to disc, HTMLEdit will attempt to calculate the relative path between the image and the document. This will then appear in the filename field, without the necessity for you to do anything. If a relative path cannot be calculated (eg. the file is on another drive or filing system), only the file's name will appear.
Note that the path is fully UNIX (and hence Mac or PC) compatible, so .. means 'go up one directory' and / is used to separate directory names. HTMLEdit will automatically convert between the RiscOS and PC/Unix methods of adding filename extensions ie. file/ext to file.ext.
Clicking on the OK button will insert the final tag.
If you wish to convert an image from a sprite to a WWW compatible format, see the section on the Import Window.
Tutorial session 2 is dedicated to setting up images.There is a new menu icon next to the image name field, which accesses the Image database. To use an image in the database, simply click on it via the
menu, and a save box will appear.
Drag the icon from the save box to wherever you want it in your WWW site, and HTMLEdit will then save it out and fill in the fields for you. You will be given the option to convert sprite files.
Clicking on the Line Break button will insert the <br> tag. Highlighting a region prior to clicking on this button will insert the <br> tag at every newline in the selected text.
You can also instruct the browser to move down until the left/right is clear for text. This may sound a little odd, but you may well need to move down below an object (eg. a picture) which is positioned to the left or right of the text. To do this, simply right-click on the line break button. This opens a menu, allowing you to pick one of the clear options for the line break tag.
Similar to the BASIC REM statement, the <!-- ... --> tag allows you to embed notes into your HTML document. These will not be displayed in the viewer's Web Browser. Comments are often used to remind yourself of the date and time of the last update, or what modifications you have made / intend to make to your page.
Highlighting a piece of text before clicking on the Comment button will mark the selected text as being the comment.
All the form/query tags in HTMLEdit are available from the Forms toolbar. You can open this by clicking on the appropriate button on the main document toolbar. You should not consider using forms until you have a fairly clear understanding of the HTML language and concepts.
If you are serious about using forms and indexing, we suggest you talk to your service provider about software and techniques available from them to assist your page creation. In particular, any information they can give you on any cgi-binaries installed on the server will prove useful.

The button to the far left is kept separate from the main set of buttons because it isn't technically related to forms. It is, in fact, a button to insert the <isindex> tag which is used to set up index-style searches without the need for a fully-fledged form.
It can be placed anywhere in your document, although modern conventions place the tag in the document header (ie. between <HEAD> and </HEAD>). The tag informs the browser program that the document can be examined using a keyword search technique, and that it should prompt the user for a search string.
This is not a way of searching the current text you are reading, a feature provided by many browsers. You can think of <isindex> as a simple front end to a search engine, and the document you search as the database represented by the document you see.
When you submit a search, the search string is appended to the document's URL in the form:
http://www.yoursite.com/
page?search+string
Note that ? separates the URL and the search string, and that spaces in search strings are represented by + signs.
You should start your form by clicking on the Header button. Highlighting a region prior to clicking on the Header button will mark this area as being part of the form. Remember that the way forms behave depends on what software is available on the Web server.
The Header button allows you to specify how the form behaves, once the user has filled it in.
You should start by selecting the method used by the form. If you are unsure about, or have no knowledge of, cgi-binaries, you should use the Post method with a URL of the type:
mailto:yourname@yourdomai
n.co.uk
ie. mailto:your-email-address
This method simply sends details of the completed form back to the email address specified. You can process the data further once it has arrived on site.
If you choose the Get method, the URL should be a standard HTTP: WWW URL pointing to the binary program being used to process the results of the submitted form. Binaries are best written in the Perl language, as this is an interpreted language available for most operating systems, including RiscOS.
Click on the OK button to create the appropriate tags. The contents of your form should then be placed between the <form> and </form> tags.
The next six icons are the different types of entity that you can have in your form. They are represented by their RiscOS equivalents. Options allows for the creation of pop-ip menus, they are self-explanatory, allowing for multiple selections on your menu, default sections and greying out.
The only peculiar option is on the menu gadget setup window, and this is the size parameter. This refers to some PC/ Unix browsers which display these as drop-down lists, not pop-up menus. By selecting the size, you can have several lines of the menu on display at once in a box.
The Submit and Clear buttons aren't really necessary (most Web Browsers add them automatically), but by using the tags for them, you can specify the actual text on the buttons.
Forms are complex entities, and are not for the uninitiated. The dialogue boxes for the different items are very similar, but we recommend referring to a dedicated HTML reference book for full information.
The standard properties for input buttons and icons are a Name and a Value. The former is for identification purposes for form processing - you need to know which icon group is being referred to. If you give a series of form elements (preferably of the same type) the same name, they become a group, each with a different value.
The Value property can be anything, but it helps if you choose a value which applies to what the icon represents. For example, if you had a list of fruit, with buttons for each, it would be sensible to set the value of each icon to the name of the fruit to which it applies.
Both the radio and checkbox form elements have a Selected option in their respective windows. If this is ticked, then that form element will be turned on, or 'selected' by default.
Finally, for text and text area form elements, sizes should be entered in characters. This harks back to the days of monospaced system fonts, and is in many respects rather useless in a proportionally spaced environment, so we recommend thinking of characters as being a fixed length and the form elements as functional rather than artistically laid out and sized!
The table button allows you to create a table in WebTable or a compatible table editor. WebTable is part of The Web Designer’s Toolkit, included with HTMLEdit Studio or available separately from R-Comp
The button will attempt to load Webtable if it is available but not loaded, and will then provide you with a size setup window. You can then edit your table, and once you’re finished, closing the window will save your table back into HTMLEdit. You may wish to set the location of WebTable via the Web Designer’s Toolkit choices on the Choices iconbar sub-menu. This is not necessary if your computer has already seen WebTable.
Clicking on the Check Syntax button will scan your page for mistakes, and incorrect tag usage.
If your document doesn’t contain any errors, the software will tell you so, otherwise a single step error window will appear. You can click in this window to get a full error browser showing all the mistakes.
It is possible to check your page to many different HTML standards, and the software will tell you of any tags, or combinations of tags, which fail validation. Several WWW browsers are also supported including Netscape Navigator, and MS Internet Explorer. By checking against these standards, you will find out whether your page will work properly with these browsers.
Before beginning a syntax checking session, the DocType tag (usually on the first line of your page) is very important. You can check and change this using the DocType option on the main HTMLEdit menu. The DocType tells the syntax checker what level of HTML compliance to check to. For example, if you had selected a HTML 2.0 document on from the DocTypes menu, anything not defined in HTML 2.0 would be reported as incorrect.
The current HTML version is 3.2, and the DocType for this is used by default for your pages. This ensures that the tags created by HTMLEdit are identified by the syntax checker, and correct HTML isn’t marked as faulty! However, you may wish to select a different DocType for checking against.
Note that some WWW browsers may use the DocType to determine the content of the page, although this isn’t common.
To begin checking, either click on the Check Syntax button on the main toolbar, or select it from the Validation main menu sub-menu. There will probably be some disc activity, after which you will either be told that your page doesn’t contain any errors, or an error identification window will appear, (above).
The view of the HTML page will be updated to show the error, with the mistake marked. The caret will move to the location of the error, too.

Clicking on the View All button opens up an interactive list of all your mistakes. This allows you to quickly skip over errors which you aren’t interested in, or gain an overview of all the errors in your page. By clicking on the line number button at the start of each error, you can move the document view down to that point, and correct the mistake.
The Validation sub-menu on the main HTMLEdit editor menu contains a ‘Links & Images’ option (checking images’ ALT text is also possible and functions identically). Clicking on this will check each image and link on your page to see that the target (the file that the link/image points to) exists. HTMLEdit will ignore off-site links, and server-based cgi scripts. If everything is correct, you will be told, otherwise, a window will open listing all the invalid links, images, and backgrounds. The list is colour coded to allow you to distinguish which are links or images etc.

By default, HTMLEdit will check your pages’ links and images whenever they are loaded into the program. This can be disabled in the Choices.
HTMLEdit supports the WebSpell plugin which is available as part of HTMLEdit Studio or separately from R-Comp. This extends the program’s functionality (but it can also be used stand-alone) giving comprehensive spell-checking and dictionary facilities. Users of Ovation Pro will be immediately at home, as WebSpell can use OvPro dictionaries and has a similar look and feel, but OvPro certainly isn’t a necessity!
Clicking on the Spell Check button on the toolbar will initiate a spell check either of the whole text, or of the currently selected region. In addition, there are other checking options and dictionary controls on the main HTMLEdit menu.
This button does precisely what it says it does - it produces a hard copy of the HTML in the current document. The print window will tell you which printer it will print to (this can be changed using !Printers if necessary - see your computer's User Guide) and if it is correct, click on OK to print out the document.
If you wish to print a copy of what the web page looks like, you should either use the print function in your WWW browser (if available), or save as a drawfile out of your WWW browser and use !PrintWeb to split the drawfile into A4 draw pages. These files can then be printed using !Draw.
For those users who like clicking on buttons, this provides a short cut to the standard save window. The window will appear as normal, and you can either click on OK (or press return) to save into the current location, or drag the HTML page icon elsewhere.
This button provides direct access to the Save as Text option on the Extra Tools submenu of the main menu. It behaves similarly to the Save HTML Page button described previously, but filetypes the document as text rather than as an HTML document.
This is preferable if you wish to include the HTML in another document being prepared in a program which doesn't normally support HTML eg. Impression or Ovation.
Clicking on the Import button opens the file import window, which is shown below:
Dragging files to the window will cause HTMLEdit to make intelligent guesses as to how you might want to incorporate it into your page.
For example, if you drag a sprite file over the import window, HTMLEdit will launch the Image Conversion Assistant (ICA), which will guide you through the process of converting the image into a WWW standard format. The ICA is covered in detail later.
The aim of the Import system is to provide a file-orientated way of working rather than a fixed 'click-on-button-then-drag-in-file' approach. If you think 'I want to include file x', HTMLEdit will let you work that way.
Note: If Web Designers Toolkit is loaded, then acces is automatically given to those image conversion facilities within the utility, which enable advanced processing of images, including the incorporation of GIFs able to resolve more than 256 colours.
Because HTMLEdit is not WYSIWYG, a button is provided to automatically display your page in any WWW browser on your computer. WebsterXL, which is frames and multi-media compliant is included in HTMLEdit Studio, and once installed on the icon bar, will display your current page whenever you click on Preview.
If you have saved your page to disc, HTMLEdit will save your latest work automatically when you click on the button (remember that F8 will undo your changes later if you don't like what you see). Once this has been done, the page will appear in the browser. HTMLEdit will automatically load a browser if you haven't done so already, provided that one has been 'seen' by your computer. For this reason, we recommend keeping a browser in the same directory as HTMLEdit.
If you haven't saved your page before, eg. if you chose not to save in the Document Creation Assistant, HTMLEdit will save your page to the Scrap directory, and preview from there. Unfortunately, since HTMLEdit doesn't know where you would want your page to be stored, it can't display any images. This is another reason why we recommend users save their page by leaving the Save Page to Disc option turned on in the DCA.
These four buttons provide direct access to some of the commonly used, DTP-style tags in HTML. A single click on any of the three buttons will insert the appropriate tags for that effect:
<B> ... </B> for Bold text
<I> ... </I> for Italic text
<U> ... </U> for Underlined text
<S> ... </S> for struck-out text
If you highlight a piece of text before clicking on any of these buttons, then the selected region will be marked with that effect. For example, the <B> tag would be placed at the start, and the </B> at the end, had you clicked on the bold button.
Clicking on this button brings up the font menu allowing you to sent font size, colour and face. Setting the font parameters are strictly an HTML 3 extension, and offers a comprehensive set of methods for altering the size relatively and absolutely.
HTML 3 defines 7 sizes of text (1 is the smallest) which can be interpreted by the browser in almost any fashion, but obviously size 2 has to be larger than size 1 and so forth. This makes the size of text rather more complex in HTML documents than in those created in DTP packages.
When adjusting the size in HTML documents, it's often better to think relatively - 'I'd like this a lot/fractionally larger/smaller than the surrounding text'. You can then use the Increase and Decrease size options to make your alteration. This way, you avoid thinking about point sizes which can't be relied upon in HTML, but rather you think about the effect you wish to achieve.
You should remember that the default size for text is size 3.
As usual, selecting a region prior to clicking on one of the menu items causes the effect to be applied to the highlighted area.
The tags created are:
<font size=(±)n>...</font>
where n is the numerical size, and the ± depends on whether you chose an increase or decrease or not.
To open a standard colour selector use the Font Colour option on the menu. This allows you simply to adjust the colour of your text. The tags created are:
<font color="#RRGGBB"> ... </font>
where #RRGGBB is the hexadecimal colour reference (described in the section on the HTML 3 Document Creation Assistant).
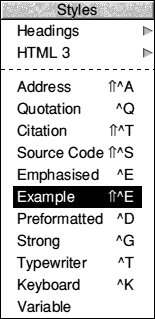
The Styles button brings up a menu tree of available HTML styles.
The Styles menu can be reached from either the Styles button on the toolbar, or from the main HTMLEdit document menu.
You can select a style from the menu, and it will then work in the same way as the bold, italic etc. effects, right down to its behaviour if you apply it to a selected region. There is a tutorial (session 3) dedicated to the use of HTML styles.
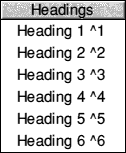
Headings Submenu HTML 3 Styles Submenu <address> ... </address> <blockquote>...</blockquote> <cite> ... </cite> <code> ... </code> <em> ... </em> <samp> ... </samp> <strong> ... </strong> <pre width=n> ... </pre> * <tt> ... </tt> <kbd> ... </kbd> <var> ... </var> |
 |
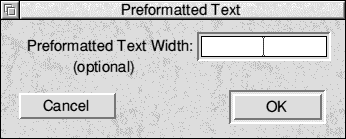 * The preformatted style uses a fixed space font such as the Acorn
font Corpus to display text that has been laid out (eg. in a text editor)
previously. A window allows you to set a specific format width if required

Font styles refer to the likes of subscript and superscript, where topic styles should be applied to quotations, abbreviations etc.
The only style on this menu is the <blink> tag, which can be applied to both text and images to get them to flash on and off.
These styles are clearly for text only, and are not supported in every browser. However, effects like subscript and superscript are otherwise unobtainable.
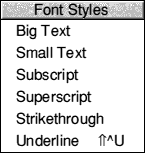
<big> ... </big>
<small> ... </small>
<sub> ... </sub>
<sup> ... </sup>
<s> ... </s>
<u> ... </u>
These styles should be applied to sections of text which are what the style says they are. They are similar to tones of voice. For example, you might have a tone of voice which tells people you are quoting someone else. In the same way, these HTML styles tell the reader something about the text to which they are applied.
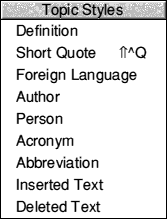
<dfn> ... </dfn>
<q> ... </q>
<lang> ... </lang>
<au> ... </au>
<person> ... </person>
<acronym> ... </acronym>
<abbrev> ... </abbrev>
<ins> ... </ins>
<del> ... </del>
Clicking on the List Types button brings up a menu of available types of list.
Each type of list has its own particular field of use. They are as follows:
<ul> ... </ul> - Unordered List - Each list item is 'bulleted'
<ol> ... </ol> - Ordered List - Each item is prefixed by its number
<dl> ... </dl> - Definition List - Items are in two parts, a heading and definition
<dir> ... </dir> - Directory- Items are laid out as if in a catalogue
<menu> ... </menu> - Menu - Used for lists of user choices
The Definition List submenu allows
you to select to enter either the
definition heading or the definition
itself, ie. <DT> or <DD>.
When you choose to create an ordered list of information via the list button, you can now select which numbering style is used. By default, standard 1, 2, 3... notation is used, but roman numerals and a, b, c... notation is also possible. Here, as in other areas of the program (eg. DCA windows, Master Pages, text conversion etc.) your choices are remembered during your session.
Clicking on the List Item button inserts the <li> tag used for the items in most list styles
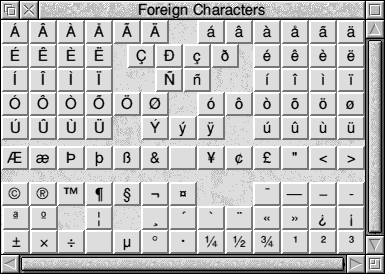
There is now a Chars option on the Choices iconbar submenu which controls the handling of these characters. Iso entity names is the default, and it ensures correct viewing even if the page viewer is using a different charcter set. Latin 1 can be toggled for browsers without entity names.
An auto-convert option accessible as you type HTML will convert foriegn characters on the fly. Access from HTMLEdit window menu.
The Plugin button on the second row of toolbar buttons brings up a new toolbar allowing access to various new multimedia extensions which require specific extensions/players for browsers to display them. The extensions are known as browser plugins, hence the ‘plugin support’ button and toolbar.

Each of the plugin buttons operates in a similar way. Clicking on the appropriate button brings up a setup window for that plugin. You may drag a file to the window to set the filename of the data for the plugin to use. This is often just the path of the file, but the Java plugin requires that the filename of the Java applet be supplied separately to the folder in which it is contained. HTMLEdit will work this out for you.
Once the file has been set, there will be plugin specific options such as looping for sounds and music, width and height for Java etc. These should be fairly self-explanatory, but please note that if you are using Java applets, you must specify the width and height - there is no way to calculate this directly from the applet.
The Horizontal Rule button inserts the very simple, but very common, tag <hr>. This is used for drawing a horizontal straight line across the page, perhaps to mark the end of a section. Simply click on the button to insert the tag.
HTMLEdit allows you to control all aspects of your horizontal rule offs, from their width and height, to shading and alignment. Horizontal rules provide a good way of splitting up a page into convenient sections, and by using different widths and alignments, you can create some interesting effects.
This allows you to access the Document Creation Assistant window from the toolbar, thus enabling a rapid new page setup facility.
Right-clicking on the document setup button (the cream button towards the right of bottom row of the toolbar) will open the Meta Options window. Please note that you should only include Meta commands in the <Head> .. </Head> section at th top of your page.
The commands available include the description and keywords for search engine registration (see Advanced DCA window at the start of these notes), author information, and page timeouts. You may also insert your own meta commands.
Page timeouts allow you to set up a sequence of pages in which the next page is automatically displayed after a set amount of time. This is similar to Teletext on your TV, where the pages cycle through a set series.
HTMLEdit unusually has full justification, (the right-most icon) which results in the usual fully-formatted block paragraph effect associated with newspapers and magazines. Note that some WWW browsers cannot handle full justification, defaulting to left alignment. In practise this shouldn’t affect your page too much as text formatting will vary between browsers and computer platforms anyway, but
you should bear this in mind.
Right clicking on any of the alignment controls or the paragraph button will create the appropriate <DIV> tag instead of the normal tags. This is used for marking sections of your document, and breaking it up. It should not be used to terminate otherwise unterminated paragraphs or tags, as many browsers ignore it. However, if you need to produce ‘classy’ HTML, breaking it into DIVs is sensible. This is strictly an HTML 3.2 tag.